As explained in my earlier post Pure FlashRecover Snapshots is one of the most used features within Purity by our customers who use these snapshots to clone their databases. In case of filesystems, the volumes that are cloned may even be part of LVM (Logical Volume Manager).
In Linux world, when volume(s) part of LVM is cloned using storage level snapshots, it doesn’t pose an issue to mount them on another host than the source. The challenge is when the cloned volumes that are part of LVM has to be mounted on the same host. A cloned volume that is part of LVM cannot coexist on the same host as the system will throw duplicate errors on physical volume (PV) and volume group (VG) as they will have the same UUID.
Is it possible to attach the cloned volume that is part of LVM to the same host? Yes, this is very much possible by using the vgimportclone command. The command vgimportclone takes care of renaming the volume group and changing the associated UUID with PV and VG.
Here are the high level steps to clone a volume that is part of LVM and attaching it to the same host.
1) Clone the volume and attach to the same host and rescan.
2) Make sure the new lun shows up when you run multipath -ll (or multipath -d -l)
(Note: If you use the alias in /etc/multipath.conf, do not include the cloned volume as device multipathing ignores the mapping. I did not spend time figuring out why this is the case and if anyone knows the reason, please update me)
3) vgimportclone -n <clonedvgname> /dev/mapper/<clonedlun>
4) pvscan –cache
5) vgchange -ay <clonedvgname>
6) pvdisplay (should show both the volumes now)
7) If needed, use lvrename to change the logical volume which might have the same name as the source.
Similar to the filesystem clone procedure, make sure to unmount the filesystem when overwriting this volume for periodic refresh.
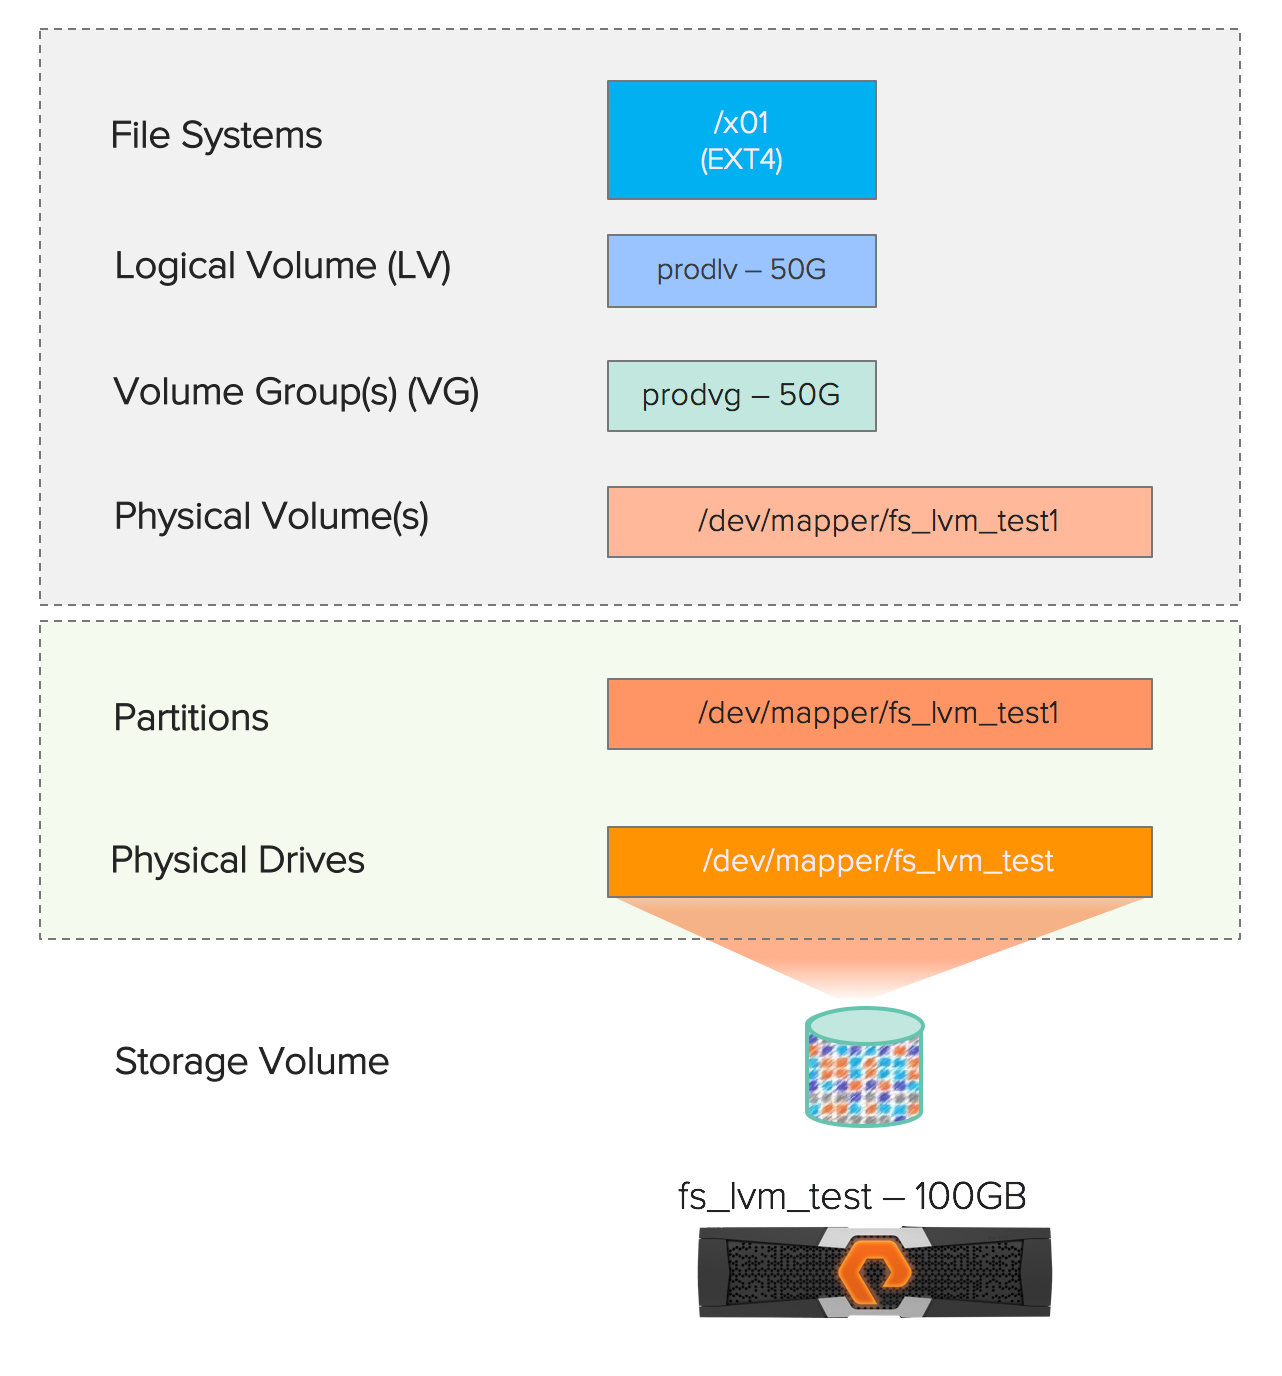
Here is an example showcasing the sequence of steps to clone a volume that is part of LVM and attaching it to the same host. The following picture shows the existing source LVM details on the Linux host. The volume fs_lvm_test from Pure FlashArray is connected to the host and the partition /dev/mapper/fs_lvm_test1 is configured as the PV on which the prodvg was created with the logical volume prodlv of size 50G which is mounted as EXT4 filesystem on /x01.
Here are the contents of the filesystem before taking the snapshot.
root@donald ~]# df -h /x01
Filesystem Size Used Avail Use% Mounted on
/dev/mapper/prodvg-prodlv 50G 1.4G 46G 3% /x01

[root@donald ~]# cd /x01/oradata/asu
[root@donald asu]# ls -ltr
total 1388040
-rwxr-xr-x 1 oracle oinstall 1319281825 Jun 10 2016 edges.csv
-rwxr-xr-x 1 oracle oinstall 102057007 Jun 10 2016 nodes.csv
-rwxr-xr-x 1 oracle oinstall 1585 Jun 10 2016 readme.txt
[root@donald asu]# touch newfile

[root@donald asu]# ls -ltr
total 1388040
-rwxr-xr-x 1 oracle oinstall 1319281825 Jun 10 2016 edges.csv
-rwxr-xr-x 1 oracle oinstall 102057007 Jun 10 2016 nodes.csv
-rwxr-xr-x 1 oracle oinstall 1585 Jun 10 2016 readme.txt
-rw-r--r-- 1 root root 0 Jul 31 19:40 newfile
Using Pure FlashArray GUI we took the snapshot of the volume fs_lvm_test and copied into fs_lvm_clone and attached it to the host. You can certainly automate this process by taking snapshot through CLI or REST based APIs.
Checking the volume detail of fs_lvm_clone showed 3624a93708c44af151613837200013c35 as its serial number.
Rescanned the host for new SCSI devices and checked the multipath output to see the cloned volume.
[root@donald ~]# rescan-scsi-bus.sh -a
Scanning SCSI subsystem for new devices
Scanning host 0 for all SCSI target IDs, all LUNs
 Scanning for device 0 0 2 10 ...
OLD: Host: scsi0 Channel: 00 Id: 02 Lun: 10
 Vendor: PURE Model: FlashArray Rev: 476
 Type: Direct-Access ANSI SCSI revision: 06
. . .
. . .

[root@donald ~]# multipath -ll |grep -i 3624a93708c44af151613837200013c35
mpathe (3624a93708c44af151613837200013c35) dm-31 PURE ,FlashArray
At this point, ran vgimportclone with the new volume group (qavg) passing the physical volume /dev/mapper/mpathe1
[root@donald asu]# vgimportclone -n qavg /dev/mapper/mpathe1
 WARNING: lvmetad is running but disabled. Restart lvmetad before enabling it!
 WARNING: lvmetad is running but disabled. Restart lvmetad before enabling it!
 WARNING: Activation disabled. No device-mapper interaction will be attempted.
 WARNING: lvmetad is running but disabled. Restart lvmetad before enabling it!
 Physical volume "/tmp/snap.cozRdFcW/vgimport0" changed
 1 physical volume changed / 0 physical volumes not changed
 WARNING: lvmetad is running but disabled. Restart lvmetad before enabling it!
 WARNING: lvmetad is running but disabled. Restart lvmetad before enabling it!
 WARNING: Activation disabled. No device-mapper interaction will be attempted.
 WARNING: lvmetad is running but disabled. Restart lvmetad before enabling it!
 Volume group "prodvg" successfully changed
 WARNING: lvmetad is running but disabled. Restart lvmetad before enabling it!
 WARNING: lvmetad is running but disabled. Restart lvmetad before enabling it!
 Volume group "prodvg" successfully renamed to "qavg"
 Reading all physical volumes. This may take a while...
 Found volume group "prodvg" using metadata type lvm2
 Found volume group "rhel" using metadata type lvm2
Ran pvscan with –cache option to refresh the LVM cache information.
[root@donald asu]# pvscan --cache
[root@donald asu]# pvscan
 PV /dev/mapper/fs_lvm_testp1 VG prodvg lvm2 [99.99 GiB / 49.99 GiB free]
 PV /dev/mapper/boot-lun2 VG rhel lvm2 [299.50 GiB / 0 free]
 PV /dev/mapper/mpathe1 VG qavg lvm2 [99.99 GiB / 49.99 GiB free]
 Total: 3 [499.49 GiB] / in use: 3 [499.49 GiB] / in no VG: 0 [0 ]
Activated the volume group using vgchange with -ay option.
[root@donald asu]# vgchange -ay qavg
 1 logical volume(s) in volume group "qavg" now active
Running pvdisplay showed the cloned volume (/dev/mapper/mpathe1) as a PV.
[root@donald asu]# pvdisplay
 --- Physical volume ---
 PV Name /dev/mapper/boot-lun2
 VG Name rhel
 PV Size 299.51 GiB / not usable 4.00 MiB
 Allocatable yes (but full)
 PE Size 4.00 MiB
 Total PE 76673
 Free PE 0
 Allocated PE 76673
 PV UUID J4NkwX-0Etx-iK7s-RKrT-EhtR-Em6b-ZgsO0Z

--- Physical volume ---
 PV Name /dev/mapper/mpathe1
 VG Name qavg
 PV Size 100.00 GiB / not usable 0
 Allocatable yes
 PE Size 4.00 MiB
 Total PE 25598
 Free PE 12798
 Allocated PE 12800
 PV UUID q6Z8Zr-BTAM-y1OH-UWrt-6blI-O0ab-jZlkGE

--- Physical volume ---
 PV Name /dev/mapper/fs_lvm_testp1
 VG Name prodvg
 PV Size 100.00 GiB / not usable 0
 Allocatable yes
 PE Size 4.00 MiB
 Total PE 25598
 Free PE 12798
 Allocated PE 12800
 PV UUID I3Wpft-yfuK-nVi9-bsEW-FS3L-b1yR-ZSjgP3
The lvdisplay showed the logical volume from the cloned volume which had the same name as source (prodlv).
[root@donald asu]# lvdisplay
 --- Logical volume ---
 LV Path /dev/prodvg/prodlv
 LV Name prodlv
 VG Name prodvg
 LV UUID qQQCfH-2R3H-B2Jl-AN7t-CAof-UTXx-UFhPFk
 LV Write Access read/write
 LV Creation host, time donald, 2017-01-03 16:20:09 -0800
 LV Status available
 # open 1
 LV Size 50.00 GiB
 Current LE 12800
 Segments 1
 Allocation inherit
 Read ahead sectors auto
 - currently set to 256
 Block device 253:29

. . .
. . .
--- Logical volume ---
 LV Path /dev/qavg/prodlv
 LV Name prodlv
 VG Name qavg
 LV UUID qQQCfH-2R3H-B2Jl-AN7t-CAof-UTXx-UFhPFk
 LV Write Access read/write
 LV Creation host, time donald, 2017-01-03 16:20:09 -0800
 LV Status available
 # open 0
 LV Size 50.00 GiB
 Current LE 12800
 Segments 1
 Allocation inherit
 Read ahead sectors auto
 - currently set to 256
 Block device 253:33
To avoid confusion, we went ahead and changed the logical volume name in the cloned LVM to qalv.
Also mounted the logical volume as EXT4 filesystem on /y01 to validate the content.
[root@donald asu]# lvrename /dev/qavg/prodlv /dev/qavg/qalv
 Renamed "prodlv" to "qalv" in volume group "qavg"

[root@donald asu]# grep vg /etc/fstab
/dev/prodvg/prodlv /x01 ext4 noatime,discard,nobarrier 0 0
/dev/qavg/qalv /y01 ext4 noatime,discard,nobarrier 0 0

[root@donald asu]# mount /y01
[root@donald asu]# cd /y01/oradata/asu/
[root@donald asu]# ls -ltr
total 1388040
-rwxr-xr-x 1 oracle oinstall 1319281825 Jun 10 2016 edges.csv
-rwxr-xr-x 1 oracle oinstall 102057007 Jun 10 2016 nodes.csv
-rwxr-xr-x 1 oracle oinstall 1585 Jun 10 2016 readme.txt
-rw-r--r-- 1 root root 0 Jul 31 19:40 newfile
Here is what the system sees after cloning and mounting onto the same host.

As you can see, it is not only easy to clone the volumes that are part of LVM but it is also easier to mount them on to the same host without any issues.

